Mediapipe Pose Detection: Flutter Library
A Flutter library for pose detection using Google’s Mediapipe.
Introduction
Before 2023, Google’s solution for machine learning (ML) on mobile was ML Kit. The library was for Android and iOS and had a variety of small models to perform common tasks that developers could use for their apps. This was before LLMs took over the public mind, so the platform heavily focused on computer vision for tasks like facial detection and image labeling. The library was well received by many developers and the developer community was even interested enough in the library that it was ported to Flutter for iOS and Android as google_ml_kit.
In 2023, Google re-introduced their on-device ML models under the upgraded Mediapipe Solutions branding. They made this change as the library supported mobile as well as web and Python, and they overhauled several models and took them out of beta. It appeared that Google updated pose detection as well, which was the model I used for FreeMoveVR. I tested out their Android app example, and it felt much smoother than what I was able to achieve in my Flutter application. The points looked less jittery and it was running at 30 fps, rather than my Flutter app at 24 fps. I decided I wanted to re-implement google_ml_kit using Mediapipe instead to try to improve my app.
Data Pipeline
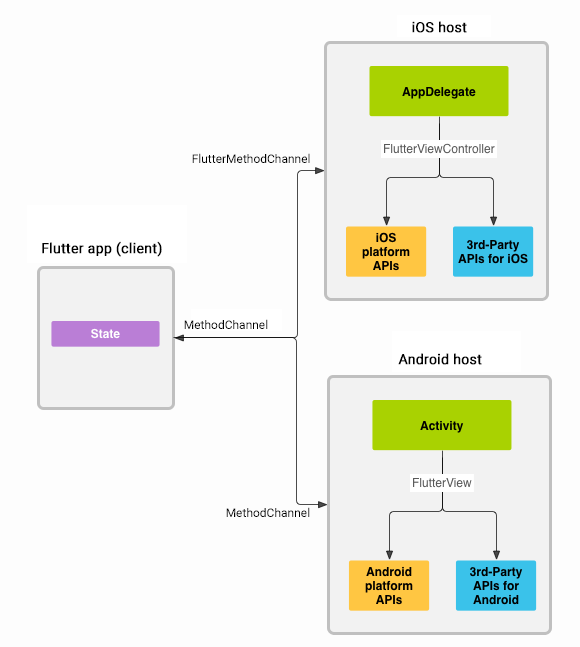
As Flutter is an abstracted layer on top of the native platform, we need a special way to pass data between these, which is normally done through platform (aka method) channels. Anytime a developer needs to interact with native APIs, it needs to take multiple steps: Flutter → methodChannel → platform host → app delegate → Flutter controller → native API, and back to return the data. The data is always passed asynchronously.
Here is the image used to explain how this is done from Flutter’s website:
Data Throughput in m_ble_peripheral
I had previous experience with making a Flutter library in m_ble_peripheral, but this library was significantly different due to the quantity of data that needed to constantly be transferred between the main application and the native code through the library.
In Bluetooth Low Energy (BLE), the size of the data transferred are measured in bytes. The messages sent to and from the app are only 20 bytes at max. The actual messages are a bit more, but that is BLE headers handled by the operating system and not viewable to the end application. There can be hundreds of messages sent a second, but that is still almost nothing.
The platform channels also have a limited number of supported data types. It’s mostly just
your standard data types in addition to null, some Lists and Map. This is really easy to
work with for m_ble_peripheral because one of the types is a Uint8List that can easily
represent notification data and UUIDs can be Strings.
Unlike m_ble_peripheral, this library would be pushing the limits on what Flutter and Mediapipe could handle real time. This was because of two factors: multiple platform jumps with complex data type augmentation and Mediapipe’s model execution time.
Data Throughput for Mediapipe
As we just discussed, there is a pipeline every time we need to transfer data, and there is a limited number of data types we can pass through. This creates a problem for video streams. Video streams contain lots of data, and need high throughput. If we are operating at 30 fps, we have less than 0.033 seconds to process data and get a result before the next frame is expected to come in. I say less than because frames may not be captured at exactly the same rate, especially if the phone is doing a lot of processing like it would be when running the pose detection model.
Framerate on Android
While debugging, I found an even greater disconnect with this intuition. While iOS can run 30 fps, I could not find any phone model on Android that ran 30 fps. Back when I was starting the app in the fall of 2022, I took a survey and ran FreeMoveVR on several of my friend’s phones:
| Phone | Year | Avg. FPS | Version |
|---|---|---|---|
| Moto g6 | 2018 | 9.0 | 9 |
| Pixel XL | 2018 | 7.4 | 10 |
| OnePlus 7T Pro 5G | 2019 | 17.0 | 11 |
| Samsung Gal S21 Ultra | 2021 | 22.8 | ? |
| Samsung Gal 10 | 2019 | 16.4 | ? |
| Samsung Gal 10+ | 2019 | 15.3 | ? |
| Samsung Gal S21 | 2021 | 23.9 | 12 |
| Google Pixel 4a 5G | 2020 | 23.5 | 12 |
As you can see, no model was capable of running at over 24 frames per second. While the average phone has increased in capabilities, any phone is able to normally record a 30 fps video. This led me to the internal code of Flutter’s camera plugin. This is the standard camera plugin for Flutter, made by the Flutter development team. During my time developing, the camera plugin in the backend used the outdated Camera 2 library for Android. With their solution, the frames that are meant to be viewed and the data as it exists to be sent for further processing are not equivalent. While the real framerate of the camera might be a full 30 fps, and the user sees 30 fps when doing a visual test, some frames are dropped when sending to the callback function I use to process the image. Because of this, I was never able to see above 24 fps in testing on Android. While this made my goal of 30 fps in this library impossible without significantly changing Flutter’s code, I decided to continue to work on this library to use the improved model and framework.
Processing Images
Let’s now return to thinking about platform channels. When my Flutter app needs to process the camera image, it needs to take many steps before it is sent to Mediapipe. The camera library runs Android’s native Camera library, Camera 2, Camera 2 returns the camera as a viewable image and a version that is made for processing, Both of these formats then need to be converted into a valid data type to be transferred over the platform channel, the Flutter Camera library then needs to re-create those images, One copy is displayed on the screen and the other is sent to my callback. The callback now needs to perform that process again in reverse to go from the Flutter side of my library to the respective platform’s native side. Then, Mediapipe does not natively support the image type that Android produces when streaming in preview mode, so we need to convert the YUV image to Bitmap. It is actually really hard to go from YUV directly to Bitmap, so actually we need to first convert from YUV to JPEG, then JPEG to Bitmap. Once it is in the correct image format, then we can finally send the image through Mediapipe to get our pose data.
While this is a complex process, it is no ware near deal breaking for our solution. From what I remember, once the image was captured by Camera 2, all of this could be done in less then 2 milliseconds, or 0.002 seconds at 240p. The main bottleneck was due to converting between image formats at the end.
Side note: 240p sounds low, but low qualities like this are actually normal input for pose detection models as higher qualities take longer for the model to process. All of Google’s pose detection models have 224 x 224-pixel input. Additionally, for pose recognition, the person normally takes up a large portion of the image and is in an unambitious position, so the model would likely only improve slightly but take exponentially longer for larger inputs.
Running the Mediapipe Model
After all this research and work, interacting with Mediapipe was relatively easy.
I added a builder to set up the PoseLandmarker object, which only needs a few
enum values. We can then pass through our image data, and the model runs
asynchronously. When the model is done, we can send the result to
EventChannel.EventSink, where my library and app are listening for updates.
Mediapipe simply has a setResultListener, and from there we format the
data in the same way as google_ml_kit to maintain compatibility for users.
This is the first time I had a memory leak in my software, so I needed to learn how
to debug that. Xcode has a tool to find memory leaks that I was able to pretty quickly
understand and use. I ended up finding the cause of it in my register function. I had it end
by kicking off a DispatchQueue that would infinity run so it could detect the image as soon
as possible. While this does not look good, in my defense, I was still new to Swift so I
based the code on my Android implementation, where running the function in a separate
thread is a valid solution. Instead, I had the detect function run via DispatchQueue
only after we had a result. From what I remember, I tried to mirror this on the Android
side but it would not work, and doing it as I described in a thread was the best solution.
Now we could ask the question of which model should be used when for Mediapipe Pose detection. Mediapipe has three models, Lite, Full, and Heavy. For my Flutter library, all three are available of course, as it is as simple as downloading the model and changing an enum in the builder. From my personal experience, the Lite model is almost unusable. It is a surefire way to hit max framerate, but it was struggling to accurately detect my legs and arms even in optimal conditions when I was standing still. I’m honestly not sure what the use case even is with this quality. Heavy is quite good, but the issue is that it would never come close to a usable framerate for my application. I am sure it is very useful for images and apps that do not require a real-time response, but I could use it for FreeMoveVR. The Full model is perfect for any live feed application. It balances quality and speed very well for modern phones, often getting near full fps on 2020 and newer.
Retrospective
I am pretty happy with how the library turned out. The only improvement I think I would
make looking back was setting up Dependabot
so my library could update automatically. Other then that, I happily use the library for
my own projects. I felt like this was a significancy more serious library for Flutter
then when I built m_ble_peripheral. Even if it is not that complex, deigning and
implementing a need I had in this way significantly helped my understanding of Flutter
and library development as a whole.
The code is available at: https://github.com/FreeMove-VR/google_mediapipe_pose_detection/tree/main